John the Ripper is a password cracker that can be used to uncover weak passwords on systems on your network. Starting with Ubuntu 9.10 John the Ripper fails to crack passwords because it does not support sha-512 encryption. Below are the steps i used to add sha-512 support to John the Ripper so that you can test the password strength of your newer Ubuntu systems.
1. Download the source for John the Ripper from http://www.openwall.com/john/
2. Extract the tar file with the following command:
tar -xzvf john-1.7.9.tar.gz
3. Open the john-1.7.9/src/Makefile and append "-lcrypt" to line "LDFLAGS = -s"
OLD VALUE: LDFLAGS = -s $(OMPFLAGS)
NEW VALUE: LDFLAGS = -s -lcrypt $(OMPFLAGS)
4. Create a new file called "crypt_fmt.c" and paste the following code into it. Save the file in john-1.7.9/src/
November 14, 2012
November 4, 2012
My path to passing VCP-510 exam
Today i took the VMWare VCP-510 exam and PASSED, so i felt i should give a brief overview of my thoughts on the exam before starting on the VCAP-DCA.
Initially i started studying for the ESXi 4 exam by purchasing the Mastering vSphere 4 book by Scott Lowe. Once vSphere 5 came out i was able to get my employer to send me to the class and i shifted my focus to vSphere 5. I attended the Global Knowledge Install, Configure, & Manage class to get started. This class alone will not help you pass the exam, i felt the class was more of a this is what vSphere is type of class. After that class i purchased Scotte Lowe's Mastering vSphere 5 and began studying. This book was very thorough and quickly became a reference for me when i was unsure about something i read from other sources. Next i purchased the Sybex VCP5 book to get more focus on what to expect on the exam. This book was pretty good in testing different concepts and i would recommend. In addition to this book i received a free copy of vSphere 5.1 Clustering Deep Dive at VMWorld in San Francisco so i started using this to learn more about HA. The only other sources i used were VMWare official Documentation and i found completed VCP Blueprints in PDF format that i was browse through from time to time. I believe one of the biggest things that helped me was the fact that i was able to setup a complete lab environment with old equipment at work. Having a test environment to practice was critical in my success. Overall i spent Approximately 3 months studying for this exam. I think i was as prepared as i could have been to take the exam so i went ahead and signed up.
For obvious reason i can't go into details about the exam, but i will try to describe what i can. Overall i think the exam was fair, however there were a few questions that i felt had multiple options. I passed the exam but i think i could have done much better if there weren't so many pick 2, pick 3 type questions. I hate those questions because even if i get 2 of the 3 correct the whole question is marked wrong. Once i got to the last questions i was pretty confident i passed and was relieved when i say CONGRATULATIONS on the screen. Hopefully in another 3-4 months i will be able to post a "My path to passing the VCAP-DCA exam".

October 8, 2012
vCenter bug with Oracle 11g databases
Problem:
There is a known bug with vCenter not closing database connections on Oracle DB's properly when shutdown. As a result when your vCenter server tries to start its services you may receive an error saying "Unable to get exclusive access to VC repository.Please check if another VirtualCenter instance is running against the same database schema."
Resolution:
The fastest resolution to this problem is to kill the open connections on the Oracle Database and then start the services normally.
In addition to that VMWare has a long term solution to stop this from happening until a patch is released. The KB below has the details of the fix.
http://kb.vmware.com/selfservice/microsites/search.do?language=en_US&cmd=displayKC&externalId=1021194
October 4, 2012
Troubleshooting vCenter 5.1 Single Sign On Installation Problems
During the installation of vmware vCenter 5.1 Single Sign On i couldn't get past the step requesting the database information. I was installing SSO in a development environment using sql server 2008 express with the default instance name of vim_sqlexp. During the install i kept getting errors saying it couldn't find the instance of sql server. Below are the steps i used to resolve this issue.
1. Open SQL Server Configuration Manager and make sure the TCP/IP protocol is enabled and make sure that the port is listed as 1433.
2. On the SSO Database Information Screen do not specify the instance name. Even if you are using a database instance only type the server name, make sure the port and database is correct and click next.
3. The install script should automatically find the instance that contains the RSA database that is required by the Single Sign On Service.

October 2, 2012
Suppressing SSH warning on ESXi hosts
By default ESXi 5 hosts will display a notification when you turn on the SSH service. It is good practive to limit the amount of service that are open on your server, however i think there are a lot of very compelling reason to enable this SSH. The steps below will show you how to suppress the warning notification on ESXi hosts.
If you want to disable the warning and the exclamation mark do the following:
If you want to disable the warning and the exclamation mark do the following:
- Select the ESXi host in the Inventory tab.
- Click the Configuration tab.
- Under Software, click Advanced Settings.
- Click UserVars.
- Change the value of UserVars.SuppressShellWarning to 1.
- Click OK.
September 28, 2012
Managing OS X from Command Line
Below are some useful commands for managing OS X from the command line.
| softwareupdate | Can be used to apply or check for updates |
| systemsetup | configuration tool for certain machine settings in System Preferences |
| screencapture | Screen Capture application |
| Say | Text to audio program. "say hello" |
| shutdown | shutdown or reboot workstation from command line |
Additional Resources listed below:
September 25, 2012
esxtop Demystified Part 1
Vmware provides a tool called esxtop to monitor the performance of vSphere esxi hosts. This tool is capable of monitoring all aspects of an esxi host like cpu, memory, disk, network i/o. The problem is when a new vmware administrator runs the program for the first time it looks a bit intimidating. Lets tackle that problem by discussing what some of the information on the screen means.
When you first run the program you will be in the cpu view. This particular view will give you stats on the various processes that are currently running on your system. Along the top of the screen you will see things like uptime, the number of worlds, VM's, vCPUs, and CPU load average.

However if you are interested in other statistics you need to know the commands necessary to get to those screens. Pressing the "h" key will display the help menu. This menu will give you a list of all the available Interactive commands available.


Lets go back to the cpu view and discuss a few of the columns.

Below are the definitions for each of the columns on the default esxtop screen.
When you first run the program you will be in the cpu view. This particular view will give you stats on the various processes that are currently running on your system. Along the top of the screen you will see things like uptime, the number of worlds, VM's, vCPUs, and CPU load average.

However if you are interested in other statistics you need to know the commands necessary to get to those screens. Pressing the "h" key will display the help menu. This menu will give you a list of all the available Interactive commands available.
Lets say we want to access network stats. All we would do is press the "n" key on the home screen and it would display each of your portgroups and the statistics related to it. You can try a few of the other switch displays to get a fell for switching between the screens.

Below are the definitions for each of the columns on the default esxtop screen.
- ID - Unique world ID. A world is an ESXi VMkernel schedulable entity, similar to a process or thread in other operating systems.
- GID - Resource group world id. If you press e in esxtop and enter the number of the GID, this GID will expand itself to show all processes in that group.
- Name - Name of the world or resource pool
- NWLD - The number of worlds in the group, when this number is greater than one the row can be expanded to get more information on each world.
- %USED - Percentage of CPU that is used by that world or group
- %RUN - When this value is near the number of vCPUS X 100%, it means that all vCPUs in the VM are busy.
- %SYS - percentage of time spent by system services on behalf of the world.
- %WAIT - Represents the percentage of time the VM was waiting for some VMKernel activity to complete such as I/O before it can continue.
- %VMWAIT -
- %RDY - Percentage of time that the VM is ready to execute commands, but has not yet been scheduled for CPU time due to contention with other VM's
- %IDLE - percentage of time the vCPU world is in idle loop
- %OVRLP - percentage of time spent by system services on behalf of other worlds.
- %CSTP - Percentage of time that the VM is ready to execute commands but that it is waiting for the availability of multiple VPUs as the VM is configured to use multiple vCPUs.
- %MLMTD - Percentage of time the world was ready to run but deliberately wasn't scheduled because that would violate the explicit CPU limit settings.
- %SWPWT - Percentage of time the world is waiting for ESX VMKernel swapping memory. If this is high it means the VM is swapping memory.
This should be a great intro into the basics of using esxtop. Look forward to Part 2 coming soon.
September 21, 2012
Multi-Hop Authentication with Powershell
Data Flow:
A -> B -> C
Make sure windows remote administration has already been enabled on computer.
On Computer A, enable this feature as a client:
- Enable-wsmancredssp -role client -delegatecomputer "*.domain.com"
On Computer B, enable this feature as a server
- enable-wsmancredssp -role server
Invoke-Command -authentication credssp -credential "domain\username" -computer "ComputerB" -scriptblock {try
{import-module lync;
Enable-CsUser -Identity <username> -RegistrarPool "lync.domain.com" -SipAddressType EmailAddress -SipDomain cpex.com}
catch{write-host $_.exception}
}
September 19, 2012
Setting vlan 0 using the ESXi 5 DCUI
Have you ever tried to change the vlan to 0 from the console of ESXi 5.0? Well if you have tried you know that it gives you an error saying the only valid range is 1-4094. If you need to set the vlan to 0 you will need to enable the ESXi shell and hit + to access the login prompt. Once you login follow the following steps:
1. Type esxcfg-vswitch -l to list the current config.

2. Lets say we want to change port group "Management Network" to be on vlan0
3. Type esxcfg-vswitch -v 0 vSwitch0 -p "Management Network" to configure the port group.

4. Thats it! If you type esxcfg-vswitch -l again you should see the VLAN ID changed.
1. Type esxcfg-vswitch -l to list the current config.

2. Lets say we want to change port group "Management Network" to be on vlan0
3. Type esxcfg-vswitch -v 0 vSwitch0 -p "Management Network" to configure the port group.
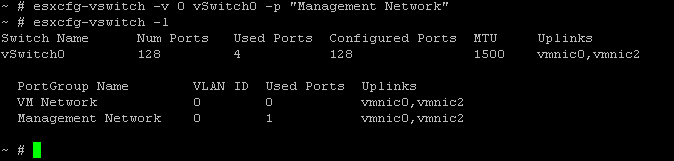
4. Thats it! If you type esxcfg-vswitch -l again you should see the VLAN ID changed.
September 14, 2012
Autologon with Active Directory Domain Account
Follow the steps below to configure a Windows 7 that is on a domain to automatically login using a domain account. **Note: This is a HORRIBLE idea, however someone out there may have a need to do this so i am posting the steps that worked for me.
Steps:
Steps:
- Click Start, click Run, type regedit, and then click OK. In Windows Vista/7, simply typeregedit in Start Search and hit Enter.
- Navigate to the following registry key: HKEY_LOCAL_MACHINE\SOFTWARE\Microsoft\Windows NT\CurrentVersion\Winlogon
- Double-click the DefaultUserName entry, type the user name to log on with, and then click OK. If DefaultUserName registry value name is not found, create a new String Value (REG_SZ)with value name as DefaultUserName.
- Double-click the DefaultPassword entry, type the password for the user account under the value data box, and then click OK. If there is no DefaultPassword value, create a new String Value (REG_SZ) with DefaultPassword as the value name. Note that if no DefaultPassword string is specified, Windows automatically changes the value of the AutoAdminLogon registry key from 1 (true) to 0 (false) to turn off theAutoAdminLogon feature.
- In Windows Vista/7, DefaultDomainName has to be specified as well, else Windows will prompt for invalid user name with the user name displayed as .\username. To do so, double click onDefaultDomainName, and specify the domain name of the user account. If it’s local user, specify local host name.If the DefaultDomainName does not exist, create a new String Value (REG_SZ) registry key with value name as DefaultDomainName.
- Double-click the AutoAdminLogon entry, type 1 in the Value Data box, and then click OK. If there is no AutoAdminLogon entry, create a new String Value (REG_SZ) withAutoAdminLogon as the value name.
- If it exists, delete the AutoLogonCount key.
- Quit Registry Editor.
- Restart Computer
September 10, 2012
PGP WDE Bootguard Password not synchronized with Active Directory Account
PGP Whole Disk Encryption does not support single sign-on functionality on Linux and Mac OS X workstations. What this means for the user is that when you enroll in PGP the first time it will sync with your current password. However whenever you change your Active Directory password your PGP bootguard password will not automatically be refreshed. To refresh the boot guard password follow the steps below.
1. Open the terminal
2. Run the following command.
pgpwde --change-passphrase --disk 0 --user username --domain 'domainname' --passphrase 'yourpassphrase' --new-passphrase 'yournewpassphrase'
Reference:
http://www.symantec.com/business/support/index?page=content&id=TECH194688
1. Open the terminal
2. Run the following command.
pgpwde --change-passphrase --disk 0 --user username --domain 'domainname' --passphrase 'yourpassphrase' --new-passphrase 'yournewpassphrase'
Reference:
http://www.symantec.com/business/support/index?page=content&id=TECH194688
June 8, 2012
Altiris NS Client on Ubuntu
Altiris Notification Server is a product that allows organizations to manage IT assets. An agent is installed on the device that allows an administrator to run reports and push software to assets. Officially Altiris NS does not support Ubuntu workstations. Altiris seems to prefer the rpm based Linux variants instead of the .deb platform. However for the Altiris agent we can force and install and make it work with a little magic.
I tried these steps with Ubuntu 11.10 & 11.04 32 Bit editions. Currently Altiris NS only supports 32 Bit versions of Linux.
Procedure:
I tried these steps with Ubuntu 11.10 & 11.04 32 Bit editions. Currently Altiris NS only supports 32 Bit versions of Linux.
Procedure:
- First go to your Altiris NS server and browse to the c:\program files\Altiris\Notification Server\nscap\bin\UNIX\Agent\Linux\x86\ folder.
- Copy the altiris ns client to your linux desktop (aex-nsclt.rpm)
- On the Ubuntu client open a terminal
- Enable the root account by typing "sudo passwd root" and set a password
- Type su -
- Now install a few prerequisite apps
- Type "apt-get install rpm2cpio"
- Type "apt-get install alien -y"
- copy the Altiris Client to the /root/nsclient/ directory
- Type "cd /root/nsclient/"
- Type the following command "rpm2cpio aex-nsclt.rpm | cpio -vid" to extract the files to that folder.
- Move /root/nsclient/opt/Altiris/ to /opt/Altiris/
- Type "alien -i aex-nsclt.rpm --scripts" to perform the install
- cd /opt/altiris/notification/nsagent/bin/
- Type "./aex-configure -iconfigure" to configure the Altiris NS Client
- When it ask you for the server name enter the URL. "http://servername/"
- Complete the rest of the questions based on the settings in your environment.
- Type mkdir /etc/rc.d
- Type mkdir /etc/rc.d/init.d
- Type ln -s /lib/lsb/init-functions /etc/rc.d/init.d/functions
- Type ln –s /etc/init.d/altiris /etc/rc2.d/S99altiris
- Type ln –s /etc/init.d/altiris /etc/rc3.d/S99altiris
- Type ln –s /etc/init.d/altiris /etc/rc5.d/S99altiris
- Type "/etc/init.d/altiris start" to start the agent
- Type "ps -ef | grep aex" to verify the agent is in the list of running processes
- Type "./aex-sendbasicinv" to send an inventory report to the NS server
- Login to the NS Server and verify that the workstation is showing up correctly.
Because the Altiris NS Client is not made for Ubuntu there may be some features that are not available, but basic inventory functionality should be available.
June 4, 2012
PowerShell Tips & Tricks (Select-String)
Are you familiar with grep in the Linux & Unix world and are looking for an equivalent Command in PowerShell to accomplish the same task? Well look no further than the Select-String Command-Let.
Select-String can be used to search files for folders for a particular string or regular expression.
Example:
To search all text files in the current directory to find the pattern Dog.
Select-string -path *.txt -pattern "Dog"
The output of this command will contain "FileName.txt:LineNumber:Pattern"
Now Lets say you would like to just return the file name that the pattern was found in so you can pipe that to another command. Use the following command:
Select-string -path *.txt -pattern "Dog" | Format-list name
May 29, 2012
BES 5.0.3 and Lync 2010 Integration

I am working with a BES 5.0.3 MR4 (Bundle 107) on Windows 2003 x64Bit server and Lync 2010 is running on Windows 2008 R2 SP1. The Enterprise Messenger client we tried was 2.5.56. Our BES environment was already pointing to a OCS 2007 server and i just needed to point it to the Lync 2010 frontend server. To accomplish this task use the original install files for BES and rerun the setup,but before running the setup a few prerequisites need to be performed. First add the Blackberry Service account to the "RTCUniversalServerAdmins" group. Next install the OCS Core Components on the BES Server. Finally install Unified Communications Managed API 2.0 Download Here. Now run the install and on the "Instant Messaging Settings" screen select "Microsoft Lync Server 2010" and i accepted the default ports as 5061 & 443. Once the setup is finished reboot the BES server.

Subscribe to:
Posts (Atom)